Wednesday, June 20, 2012

Anything-But-Rotten Tomatoes

Ahhhh summer. 

Summer food is filled with fruit and fresh vegetables and herbs you grew yourself (unless your basil was suicidal, like mine was).  It's fresher and brighter and prettier.  And you can make your teeny stuffy hot house less hot and stuffy by sweet-talking Red Beard into cooking everything on the barbecue.  

And there's tomatoes.

Lots and lots of tomatoes. 

I love tomatoes.   Really love them.  In fact, I tend to over-estimate just how many tomatoes two people can eat before they'll go icky and buy way too many at a time.   Which leads to marinara.  Which is guilt-free because pasta night is wonderful. 

New ways to use up almost-but-not-quite-wonky tomatoes is what led to the creation of tomato pie.   You know the kind of tomatoes I mean, not quite nice enough to eat plain and fresh, just a little soft around the edges, but not bad enough to throw away.  And not quite soft enough to go to the trouble of making another vat of marinara sauce.  Let's face it, good tomato sauce takes time and energy and isn't helpful at all in terms of keeping things less hot and stuffy.

Tomato pie is awesome.  It has bacon in it.  As all things should!


It's also hot and cheesy and basily.

The ingredient list is fairly simple, and includes a lot of things that you probably already have hanging around, if you cook on a regular basis, and this assembly goes quickly.  Especially if you cheat like I did and buy a pre-made crust.  Yes, of course I know how to make pie dough from scratch, but why would I when Pillsbury (or in this case, Raley's fine foods) does such a great job?  If you are feeling all cool and Martha Stewart-y and productive, by all means, make your own.  I won't hold it against you.
 
  • 1 pie crust (or, if you've got a fancy schmancy super deep pie dish like mine, use 2; overlap them about a third of the way and roll them both out together)
  • 1 medium-to-small potato
  • 1/2 small-ish red onion
  • 1 celery stalk
  • 3 big fat garlic cloves
  • 1/2 bell pepper
  • 1/2 cup panko bread crumbs (this is important, no regular Italian bread crumbs, too heavy)
  • 1 cup grated jack or mozzarella cheese, divided 
  • 1 cup grated parmesan cheese, divided
  • 2 strips of thick-cut bacon (or 3 regular ones)
  • 1/4 cup heavy cream
  • 1 egg
  • 1 cup of fresh basil, chopped
  • 1 cup of fresh flat-leaf parsley, chopped
  • butter
  • salt 
  • pepper
  • nutmeg (hopefully, you've got the lovely whole nuts and you grate them yourself on a microplane, right??)
  • 1 lemon 

... and of course, tomatoes.  I used some heirlooms and a few camparis that were hanging around, but really, use whatever you like to eat fresh.  There's no real amount to give you, because it will depend on how many you can cram on the top of your pie.  I have a very large pie dish.

Blind-bake your pie crust according to package (or recipe) instructions.  I do not bother with beans or rice or pie-weights.  I prick the crust all over with a fork and (mostly) it always comes out fine.  


Bake until lightly golden, and cooked through (no shiny raw spots) but not super dark - the edges will darken up more when you bake the finished pie.  The bottom will cook a little more as well.
 
Peel and slice your potato, and boil until fork-tender in nicely salted water.  Pretend you're making mashed potatoes for a very small and not-very-hungry leprechaun.


While the potato is bubbling away, mince the garlic ...


Finely dice the onion ...


Give the celery a chop ...


Dice the bell pepper ...


And dice the bacon ...


In a skillet over medium heat, cook the bacon down until the fat is all rendered out and the bacon bits are getting crispy.  Then, add your beautifully chopped veggies and saute until the celery is soft.   If your pan gets too dry, add a little bit of butter. 


Season with salt and pepper and set aside.  

By now, your potato should be more than cooked ... hopefully you've been keeping an eye on it this entire time, and practicing your multi-tasking!  Drain your potato, and add it to a nice big mixing bowl.  Season well with salt and a whole lotta pepper.  


Like any potato-based product, we'll need butter.  Add about a tablespoon.


Mash everything together with a fork and add the panko bread crumbs.


Then the egg.


Add half of of the grated jack or mozzarella cheese (really, any white cheese will do).  I got excited because of the cheese and didn't take a picture - just use your imaginations.  Add half of the parmesan.  Mix well.


Now mix in your lovely bacon-vegetable mixture and half of the chopped herbs (as in, half a cup of the basil and half a cup of the parsley).


Add in the zest of the lemon and about 8 or 10 grates of fresh nutmeg.  If you are using the pre-grated nutmeg, only put in a pinch.  Pre-grated nutmeg is a lot stronger than the fresh grated and it can get overwhelming fast.  It isn't nutmeg pie.  

Taste and adjust the seasonings.  Unless you're weird about the raw egg in there.  I'm not weird about raw eggs.  

Spread a fairly thick layer in the bottom of your pie shell.  Don't be afraid to squish it all down.


Most likely, you'll have some filling leftover.  I think it depends a lot on the size of your potato, not to mention the size and depth of your pie dish.  Leftovers are fine.  Leftovers mean you can do this:


Hollow out a few baby tomatoes, stuff with any leftover stuffing, sprinkle with cheese and bake (uncovered at 400ºF) until gooey.  Perfection!

If you're planning on making this a day ahead of serving, stop now.  

The crust and potato filling will hold fine in the fridge, as long as it's well wrapped.  Once you add the tomatoes, however, you've got about a 2 hour window before you need to get it in the oven.


Speaking of the tomatoes ....


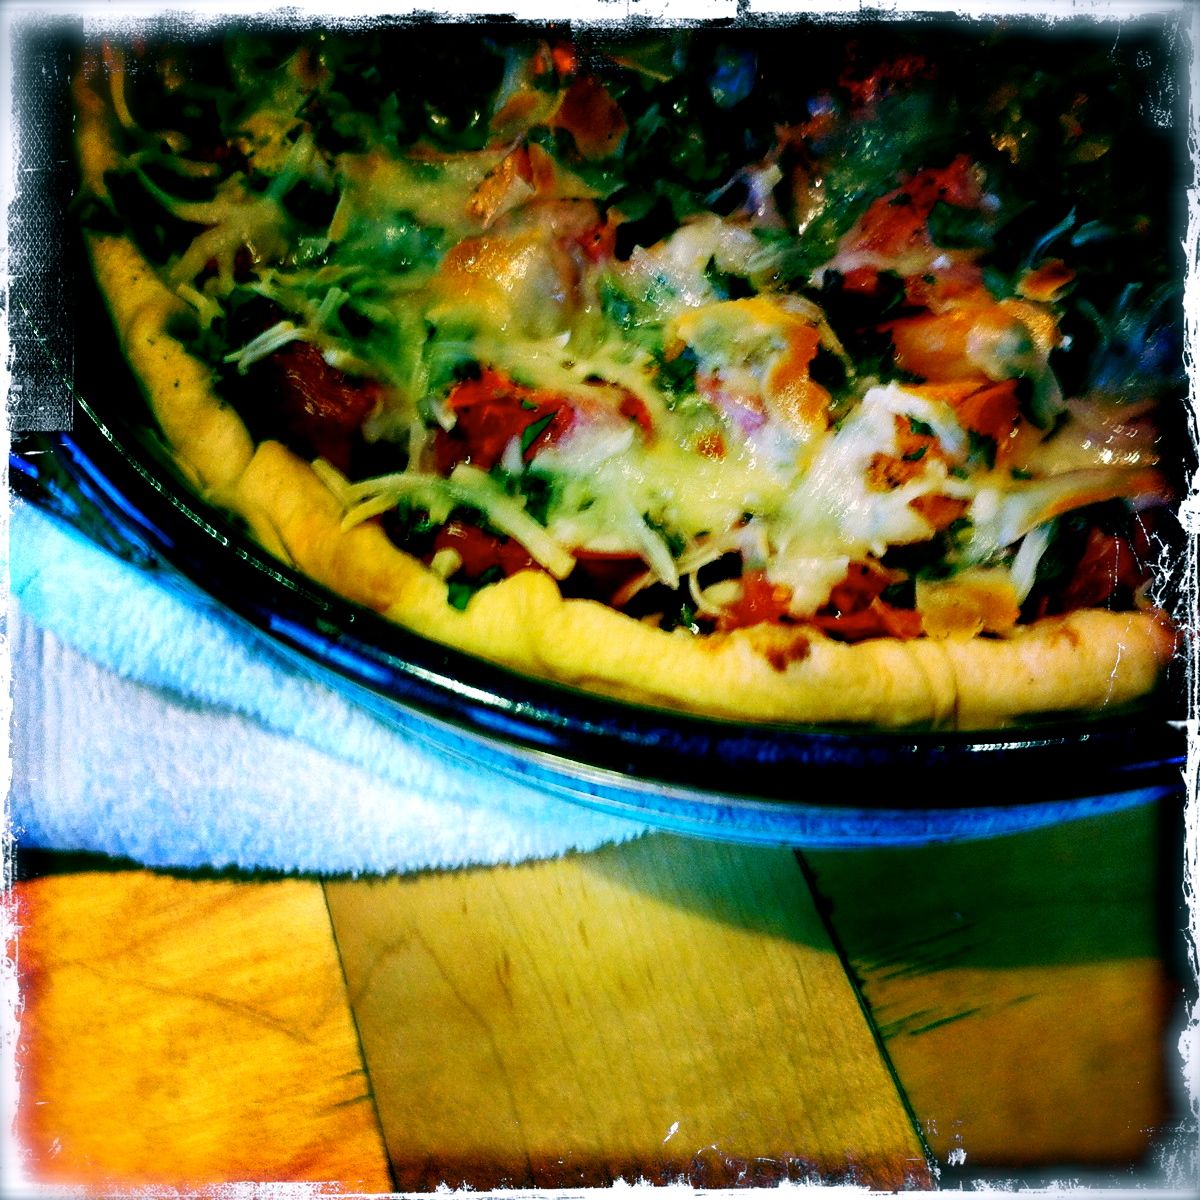
If you really want, you can do slices and arrange the on the top.  Despite my OCD, I prefer random chunks for this.  Don't be shy, use a lot.  You want a full, crammed, no-sign-of-filling-underneath, mix of colors layer.  Don't worry about the juice and seeds - the breadcrumbs soak up all that - I promise, this doesn't turn into a soggy mess.


Season the tomato layer with salt and more (and more and more) pepper.  Sprinkle the top with the remaining herbs (basil and parsley) and cheeses.


Bake at 375Fº for about 35 to 40 minutes, until the cheese is melty and starting to brown, the tomatoes are all soft and roasty, and your crust is golden brown.  


Let it rest of 10 minutes before you cut it.   I'm always expecting the bottom to be a little soggy, or the slices to come out messy, and each time I'm amazed at how cleanly this serves, despite all of the juicy tomato lovelyness.  


We ate ours with roast beef for Father's Day dinner.  But it's also wonderful for brunch.  Or along side BBQ ribs and coleslaw.  Or as a snack the next day.  Or as a 4th of July potluck item.  Or because it's a day that ends in "y".


As much as I think the bacon is one of the best parts of this, you could easily go vegetarian with this, just use butter and olive oil to saute with.  Sorry, though, no vegan options - there is no way to omit the cheese without killing it.

Printable version hanging out over @ Tasty Kitchen!  (CLICK ME!  CLICK ME!)

Monday, June 18, 2012

How Times Flies!

Yes, it's true.  After 11 long weeks, I'm back.

Did you miss me?

Admit it, you missed me.  A least just a little bit.

I don't really have an excuse.  I've been cooking - I've been cooking a LOT.  I've been taking pictures.  I've been really really busy doing all sorts of food pusher-type activities.  So busy, that there just wasn't any time to translate food and pictures to a blog. 

Spring activities included my OCD going into overdrive ...

New shelving in the laundry room means I almost have enough pantry space.


... making sure the Adorable Wonder Kitten had ample play time ..

Blog?  Who needs to blog when this is snuggling with you?

... switching out old itchy ancient flannel couch for new lovely leather sofa (I love hand-me-downs) ...


Puppy tested & Food Pusher approved.

... pink flamingo hunts ...


He was very proud of his stalking abilities.

... making friends with the new toad in our garden ...


We've decided to name him Tobias.

... a few batches of cupcakes ...


Chocolate Cherry with Marshmallow Frosting.  Yes, the cherries are chocolate-dipped.


... some mini fruit tarts ...


Orange Vanilla Cream & Mixed Berries.


... a birthday cake for 2 of my favorite nephews ...


Sponge-Bob rocks among 3 & 7 year olds!
... spending lots of time in my garden ...


... more cupcakes ...

Mini Vanilla Cupcakes, with teeny tiny peacock feathers made from spun-sugar.


... and some brownies ...

Raspberry Dark Chocolate Brownies, with whipped cream & sugared fresh raspberries.

... lemony cheesecake bars ...

Amazon is a phenomenal source for specialty candies.

... and about 10 pounds of chocolate dipped strawberries ...


I love party food.

... not to mention all of the gardening, family events, Granny episodes, and wedding planning.   Coming up, there's barbecues, engagements parties, camping trips, family dinners, birthday parties, and potlucks - plenty of food blogging opportunities! 


Hope you've all had an eleven weeks even half as fantastical as mine!

Coming up tomorrow, Heirloom Tomato Pie.


Wednesday, April 4, 2012

Ocean Spray & Sand Dunes

I had a very Martha-Stewart-meets-that-guy-from-Trading-Spaces type of a weekend.  

Red Beard and I rent a very sweet and cute and lovely 1930's house from a very nice couple who are the most laid-back landlords I've ever had in my life.  Our only "rules" were to not kill the lawn (and since the owners pay for the lawn service, that isn't a hard rule to follow).  Pets?  Sure!  Painting?  Sure!  Hanging shelves?  Sure!  As a bonus (depending on the day), the house is across the street from my little old granny, making keeping an eye on her a lot easier than if we lived across town.  Especially given Granny's propensity for 10PM phone calls, needing us to come over RIGHT THIS SECOND because she's messed up the cable box again. 
   

Still old but much improved.

Our house has a lot of original details, such as the custom cabinets and tile in the kitchen, the super cute flippy handles on the cupboards, the little phone cubby in the hallway; we've also got a wood-burning stove (which kept our heating oil bill down to almost nothing this winter), two very nice-sized bedrooms, ample closet space, and a laundry room that's actually bigger than the kitchen.  It's quite lovely and warm and charming and perfect for the two of us, plus a very spoiled kitten.  

Okay, so there are some drawbacks.   For example, as cute as my kitchen is, there is almost no counter space.  Zero.  Zip.  Nada.  And half of the space we have is often dedicated to drip-drying dishes (because no one had dishwashers in 1939).   And the upper cabinets come down over the counters much lower than is standard in the 21st century - a wine bottle (let alone a coffee maker or a Kitchen-Aid mixer) doesn't fit underneath them.  Which translates to normal counter items needing to be stored and used not on my counter. 

But by far, the biggest issue we have had for the past 10 months, is the bathroom.  

I was worried when we first moved in about the logistics of sharing a bathroom on a daily basis with a boy.  I've never had to do that before, except on a short-term basis (you know, sleepovers, out-of-town trips, stuff like that).   Unless we go WAAAAAAY back to when I still lived at home, there hasn't been a lot of boy-bathroom-sharing.  And even back then, in our teeny tiny condo, we had a second half bath where my mom and I set up the girlie command station.  

Turns out, sharing was and is super easy.  It helps that Red Beard goes to work at least an hour (if not more) before I do.  But even when we're both getting ready at the same time, it still goes fairly smoothly.

The problem is not sharing.

The problem is (or rather, as of last Sunday, WAS) the walls.  And the cabinet.  And the original tile in the oh-so-asthetically-pleasing combination of shiny dark red and dull pinky-peach.  Our bathroom was gross.  Despite regular scrubbings, and almost daily quickie wipe downs with a Clorox wipey, and pictures, a cute shower curtain, and fluffy towels, our bathroom was just a nightmare.  For some reason unknown to normal people, the walls had been painted a dark teal ... then textured over (the texture behaves a bit like old wall paper, except the teal bled through) with weird ridges and swirls, then painted again a very awful and depressing band-aid color.    You needed a Xanax every time you showered.


Rusted Hardware.  Weird color.  And if you look close, you can see where they decided to paint on the wall instead of cutting in around it.


The toilet is set so close to the wall that you have to lean a little when you sit down.  This is great if you're drunk.  This is not so great on a normal day; it leads to a permanently bruised elbow.  It's also a little "interesting" in the event that you are babysitting for three boys ages almost-3, four, and almost-7.  Little boys whom I love and adore, but who don't aim very well.  I use Clorox wipies on the wall a lot too when Thing 1, Thing 2, and Thing 3 come over.


Notice that the toilet is crooked on top of everything else.

We really couldn't do much about the toilet.  If you use a flashlight, you can see the layers of paint behind it - meaning no one has tried removing the toilet in years.  Red Beard was having nightmares about the floor getting torn up if we tried to take the toilet out ... so instead, I got to practice my yoga when it was time to paint around/behind it.


Did I mention dark & dingy? And permanently dirty looking?
Red Beard spent over two hours with a power sander, trying to mellow out the texture on the walls.  Then he made BFFs with his shop vac and a wet rag, cleaning up from the sanding party.  All of this, after a very long and full work day.  He also made sure to take care of the things I would have totally just blown off, like taking down the switchboard cover and pulling the towel racks off the wall (I would have just painted around them).  Sometimes, he can be a saint.  Naturally, he also had to paint the crown and the ceiling because I'm short and have a slight fear of ladders.  I don't find ladders quite as terrifying as clowns and ferris wheels, but it's a close third. 

After the love of my life did all sorts of prepping for me, we went paint shopping (and had Thai food and got cut off horribly in the Home Depot parking lot).  I was aiming for a very nice not-too-dark aqua color.  Nothing crazy, just something that had enough gray in it to be a neutral.  Plus the shower curtain we already had not only had red and weird peach (to match the tile) but also two different shades of a very nice aqua in it.  I was trying to make the accessories we already owned work with the new paint.

Yeah, it didn't quite work out that way.  

The paint we purchased, while matching the existing curtain perfectly in a small chip, did NOT match once two coats had been worked into the wall.  I say "worked" because the remaining wall texture (post-sanding) did not want to be painted; I had to force the paint into the remaining ridges with a paint brush, then roller, then touch up with the brush ... and roller again.  And touch up again Sunday morning.

Needless to say, I was not going to re-purchase paint and re-paint the walls and re-exert all of that effort.  Instead, I bought a new shower curtain.  Entirely worth the $14.99.  My OCD has been thanking me every time I walk by the bathroom.


Ahhhhhhh, relief from the depression!

We chose two lovely colors, both from Glidden (in a semi-gloss paint and primer combo):  one gallon of Sea Spray (GLB19) for the wallS, and a quart of Summer Sandcastle (GLC06) for the trim, the ceiling, the door, and the cabinet.  


So soothing. 

I also had a can of super duper shiny metallic silver spray paint, which landed on the base of the light fixture, the toilet paper holder, and all of the hardware on the cabinet.

No more rust!  And notice that I did go to the trouble to cut in properly around the wall.

The artwork turned out awesome (if I do say so myself) and budget-friendly.  I downloaded and printed pictures of vintage travel posters and slipped them into $2 frames.  Voila!  Now I just have to spray all the frames a chocolate brown, to match the dots in the shower curtain; the black is too harsh and is making my eye twitch a little.


I no longer live in fear of contracting the ebola virus when I touch the walls.


I have to say, I love it!  Despite all of the work, and the pain, and the five stores I had to go to, in order to find a curtain that matched the paint, it was completely and utterly worth it.

By the pain, I mean I woke up at 3am Sunday morning because my arm was throbbing so much.  See, I'm short, and all of the painting and rollering over my head did quite a number on my arm, and of course my back and shoulders.  And my knees are visibly bruised from the contortions necessary to get that super sharp line at the floor and paint neatly around the wonky toilet.


Wonder Kitten likes to curl up in this sink while I'm doing my hair every morning.

 Now if I could just figure out a way to add counter space in the kitchen .... does anyone have a magic wand I can borrow?

Wednesday, March 28, 2012

Vive la France!

Or rather, vive la French Dip!

Red Beard has a soft spot for french dip sandwiches.  Beef, lamb, pork ... onions or no onions ... cheese or no cheese .... fancy or trashy.  He loves them.  And since they are a fairly easy dinner option (with a few side dishes), I've decided I love them too!


Best part:  the entire prep (when I'm not taking pictures at least) takes less than an hour with a minimal amount of dishes to do.  And it involves melty cheese.

I really love anything that involves melty cheese.  I also adore any occasion where I can disguise leftovers.  In this case, I was using up roast beef from a couple nights prior.  Nice roast beef, with lots of garlic.  Sure, I could have sent it with Red Beard to work in a cold sandwich, but this is so much tastier.

You'll need a few things to pull this off, but a lot of it is stuff you probably already have on-hand.  Aside from the beef and rolls, I can pretty much guarantee that I have some sort of cheese, and more condiments than my fridge door can comfortably hold (like mayo and dijon and worcestershire and sriracha ... and butter).  Onions and peppers and garlic are staples in my kitchen.  And you know, you just KNOW I've got wine. 

  • 8 ounces roast beef (either leftover roast, sliced super thin, like me OR sliced from the deli counter)
  • 1 whole bell pepper (any color);  3/4 nicely julienned and the rest rough chopped
  • 1 whole red onioin; 3/4 nicely julienned and the rest chunked up
  • 1 clove of garlic, well squished
  • 2 sandwich rolls (any type you like, but french or dutch crust are the nicest)
  • 8 ounces of cheese, sliced thin (any type you like, but I've found colby, swiss, provolone, and havarti work the best)
  • 1 tablespoon creamy horseradish
  • 1 tablespoon dijon mustard
  • 1 tablespoon mayonnaise
  • Kosher salt
  • Pepper
  • 1 tablespoon of butter plus butter for the bread
  • 1 tablespoon plus 1 teaspoon of olive oil
  • Fresh OR dried rosemary
  • 1 cup red wine
  • 1 small can low sodium beef broth
  • Worcestershire sauce
  • Sriracha sauce OR Tobasco

Mix together the mayo, dijon mustard, and horseradish and set aside.  This is your sandwich spread. 

First things first; let's talk au jus.  That wonderful, yummy, sploshy broth to dip the sandwich in.  Yes, of course, you could buy the Knorr packet and just mix with water.  But really?  All those preservatives?  I tried it once, thought it tasted like the little cubes of bouillon powder (so, ick), and made up my own version.  Surprise!  I'm making things up again!
In a small saucepan, over medium heat, add the teaspoon of olive oil.  When the oil is hot, add the rough-chopped onion and pepper bits, the squished garlic, and either 1 sprig of fresh rosemary OR 1/2 teaspoon of dried rosemary.  I was out of fresh.  I was also being cranky and refused to drive the 3.768 minutes to the grocery store.  Dried worked fine.    


Then toss in some red wine (about a cup) and a small can of low sodium (always always low sodium!!) beef broth.  Season to taste with salt and pepper.  Add a couple splashes of Worcestershire sauce and as much sriracha as you can handle.  I think I added only a small squirt, less than 1/2 a teaspoon.  I wasn't going for mouth-burning-scary-hot, just nice and warm. 

With regards to the low-sodium broth.  I like to add salt to foods; I like to be in control of the salt in my foods.  It's the same reason I prefer unsalted butter.  I have control issues.  Non-fat broth isn't something I look for.  If I happen to find a broth (chicken or beef) that is both low sodium and low fat - yay!  But taking the fat off of broth is easy - just set it in the fridge for awhile - that fat rises to the top and will solidify in the cold.  You can peel it off in a layer.  Easy peasy.  But there really isn't any way to pull the salt out.  


Sorry for the steam.  Hey, at least you know I'm actually cooking here!
Let it bubble while you prep everything else.  The longer it simmers, the yummier it will be. 

Now, in a skillet or frying pan, or another pot if you really want to be a rebel, heat the remaining olive oil and butter together over medium heat.  When the butter is melted, add your onions and peppers (the pretty julienned ones) and saute until the peppers are still a little crispy, but the onions are starting to caramelize.  Season with a little salt and a lot of pepper.   Bland is boring. 


Almost done!

While the onions and peppers are cooking, split your sandwich rolls, and butter them generously (because butter is awesome) and lay them out on a sheet pan.


Pop them under the broiler until they look like this:


Toasty bread is always nicer than regular bread.  ALWAYS.  Just keep an eye on them because I can't even tell you how many times I've burned bread under the broiler.  Nicely browned is only 5.68 seconds away from charcoal.  Slather the sandwich spread you made over everything.


Now, add your beef to your au jus.  It isn't going to be in there long, just long enough to get really hot and soak up a little of those yummy flavors. 


When everything is ready - the onions and peppers are dreamy, the beef is hot, and the bread is toasty - start assembling. Begin with toasty bread (all smeared with mustardy horseradish), and layer on your meat and peppers/onions.  Just make sure that whatever dish you're using is oven-safe.


Then add as much cheese as you can handle without your system going into shock.


Now comes the best part.  Before you add the top piece of bread, pop the sandwiches under the broiler one last time until the cheese is gooey.   Top the sandwiches off, add a cup of the au jus, and if you really want to make your family happy add a little of this:


We eat salad with everything.  It makes us less guilty about all of the cheese.
And a handful of these:

Sweet Potato Fries, available in the freezer section of Trader Joe's.  They are extra special when seasoned with a little cinnamon & chili powder.

Aside from being a gastrointestinal hootenanny, this meal is also not as guilt-laden as you may think at first glance.  Sure, there's cheese and butter and bread.  But if you can manage to limit yourself to 1/2 a sandwich (which I did do, and it was quite difficult), and eat plenty of salad, it's really not all bad.  There's a ton of veggies.  And the fries aren't fried and aren't regular potatoes.  Sweet potatoes are always being touted as a healthy alternative.  So I say eat the fries, enjoy the cheese, and fill up on salad.  And try to avoid the Haagen-Daz in the freezer, or all of those sweet potato brownie points will fly right out of the window.


Recipe now available @ Tasty Kitchen ... Click me!!